 NounDesk
Connect Google Android Enterprise
NounDesk manages phones through Android Enterprise, Google’s built-in device management. Your company connects to Google once, and from then on you can enroll devices.
Who: Owner. Admins, Operators and Viewers can see the connection status but can’t connect.
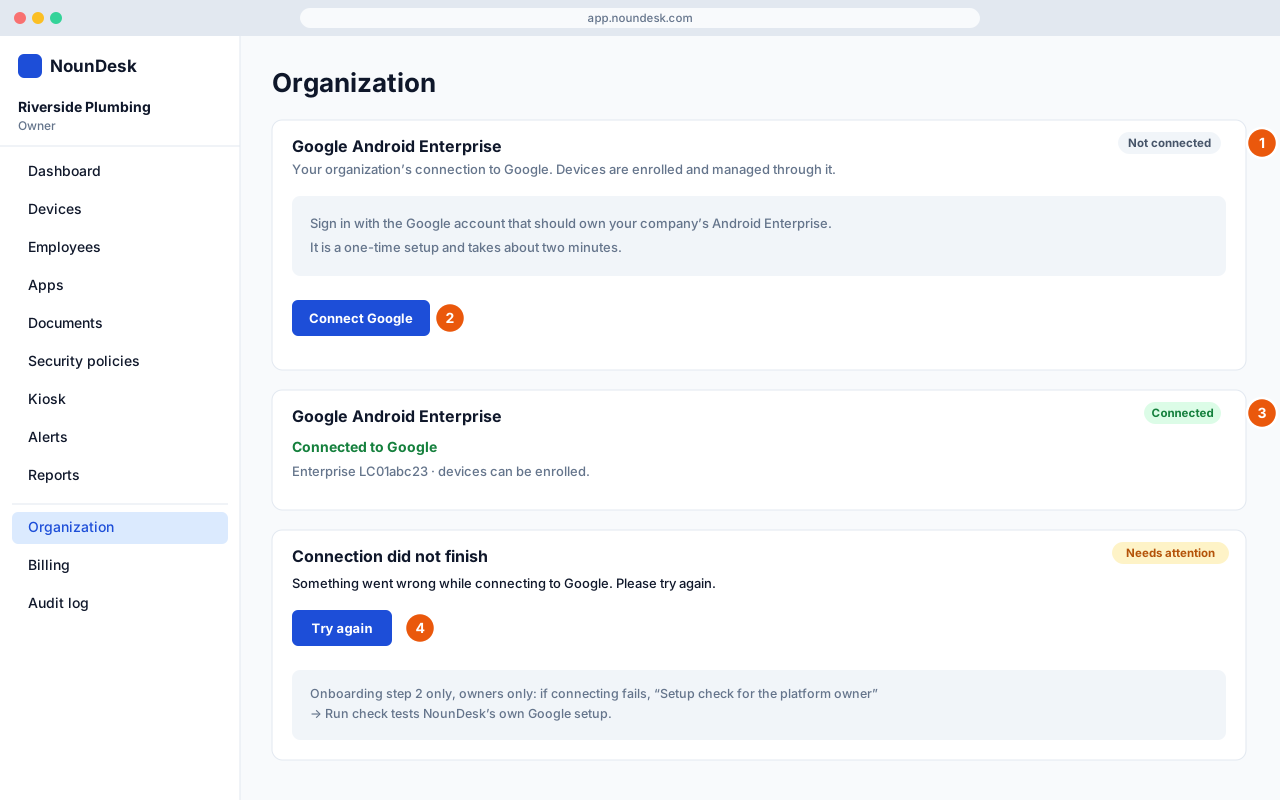
Before you start
- It takes about two minutes and only happens once.
- Sign in with a Google account on your company email, or create one on that address when Google asks. Google doesn’t accept personal Gmail addresses for this.
- If your company uses Google Workspace, your Workspace super admin should do this step.
- Nothing is installed on your computer. Google sends you back to NounDesk when it’s done.
Connect during setup (onboarding step 2)
- After you describe your business, NounDesk shows Step 2 of 4: Connect your company to Google.
- Select Connect Google. Google’s sign-up page opens.
- Sign in with your company Google account and follow Google’s steps to approve your company’s Android Enterprise.
- Google sends you back to NounDesk. When it worked you’ll see Google connected. Choose Add your first device or Go to dashboard.
Not ready yet? Select Skip for now, I’ll do this later. You can’t enroll devices until you connect, and the dashboard shows Connect Google to get started with a Connect Google link until you do.
Connect from the Organization page
- Go to Organization and find the Google Android Enterprise card.
- Select the button on the card (its name depends on the status, see below).
- Finish Google’s steps. Back in NounDesk you’ll see Connected to Google: “You can now enroll devices.”
When you’re connected, the card says your organization is connected and shows your Google enterprise ID in small print. Once you connect, NounDesk also prepares your security policies with Google so new devices can use them straight away.
What each status means
| Badge | What it means | What to do |
|---|---|---|
| Connected | Your company is connected. Devices you enroll are managed under this Google enterprise. | Nothing. Go to Add devices. |
| In progress | You started Google’s sign-up but didn’t finish it, for example because the Google window was closed. | Select Continue (on the Organization card) or Continue with Google (during setup) to start again. |
| Needs attention | The last attempt failed. The card shows Last attempt failed with the reason. | Read the reason, then select Try again. |
| Not connected | You haven’t connected yet. | Select Connect Google. |
If you aren’t the Owner, the card says Only the organization owner can connect Google. Ask them to complete this step.
If the connection doesn’t finish
NounDesk shows Connection did not finish (on the Organization page) or an error message (during setup). The most common ones:
| Message | What to do |
|---|---|
| Google did not return what we expected / did not finish the sign-up. | Start the connection again from the same page. |
| This organization is already connected to Google. | Nothing. You’re already connected. |
| Google is rate limiting requests. Please try again in a minute. | Wait a minute, then try again. |
| Google’s service is temporarily unavailable. | Try again shortly. |
| Only the organization owner can connect Google. | Ask the Owner to sign in and connect. |
Setup check for the platform owner
If connecting fails during setup, the Owner sees an extra section, Setup check for the platform owner. It’s meant for whoever runs the NounDesk service, not for everyday customers.
- Open Setup check for the platform owner.
- Select Run check.
It shows a list of technical settings, without revealing any secrets:
- which mode NounDesk is running in (simulated or real Google)
- the Google Cloud project NounDesk is set up with
- the service account NounDesk signs in to Google with, and which project it belongs to
- whether those two projects match
- whether NounDesk’s Google credentials can be read
- the result of one live test call to Google, with Google’s own message and, for common problems, a hint on how to fix it
If you’re a NounDesk customer and see this, copy what it says and send it to support@noundesk.com. You don’t need to change anything yourself.