 NounDesk
Network settings
The Network card in a security policy puts your Wi-Fi networks on every device and controls what employees can change themselves. It also sets up an always-on VPN and Private DNS.
Who: all roles can view. Changing settings needs Owner or Admin.
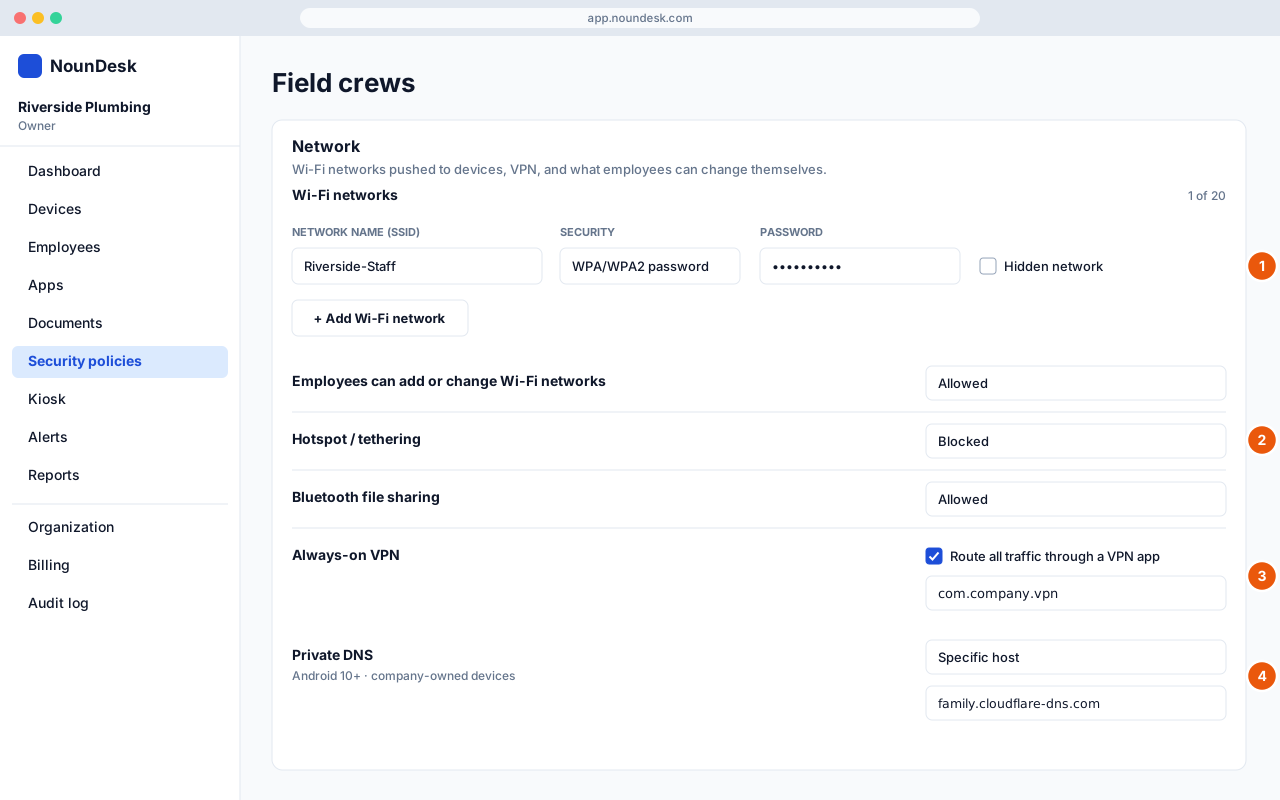
Push Wi-Fi networks to devices
Pushed networks appear on every device with this policy, so employees never need the password.
- Go to Security policies and open the policy.
- In the Network card, select Add Wi-Fi network.
- Fill in the row:
- Network name (SSID): the Wi-Fi name exactly as it appears on a phone (up to 32 characters).
- Security: WPA/WPA2 password for a network with a password, or Open (no password).
- Password: 8 to 63 characters. It’s hidden as you type; use the eye icon (Show password) to check it.
- Auto-connect: ticked by default. The device joins the network on its own when it’s in range.
- Hidden network: tick this if the network doesn’t broadcast its name.
- Repeat for other networks. The counter next to Wi-Fi networks shows how many you’ve added, up to 20.
- Select Save draft, then Publish… to send the change to devices. See Policy versions and publishing.
To remove a network, select the bin icon at the end of its row and publish. The publish preview warns you that the network will be removed from devices.
- Pushed Wi-Fi networks work on company-owned devices.
- Wi-Fi passwords are stored in the policy and sent to devices. They’re masked in the editor. Treat them like any shared password.
- With no networks pushed, devices keep whatever networks employees add themselves.
- If a network the employee saved earlier conflicts with a pushed one, the device may ask them to forget it. The device’s Security tab says so.
Control what employees can change
| Setting | Options | What it does |
|---|---|---|
| Employees can add or change Wi-Fi networks | Allowed, Blocked | Blocked stops employees adding, changing or forgetting Wi-Fi networks. Push every network they need first. |
| Hotspot / tethering | Allowed, Blocked | Blocked stops the device sharing its mobile data as a hotspot or over USB or Bluetooth. |
| Bluetooth file sharing | Allowed, Blocked | Blocked stops sharing files over Bluetooth. Bluetooth itself stays on, so headsets and car kits still connect. |
All three need company-owned devices and work on Android 5.0 and newer. The Maximum Security template blocks hotspots and Bluetooth file sharing.
If you block Wi-Fi changes, the publish preview asks you to confirm that employees can no longer add or change networks themselves.
Always-on VPN
Keeps the device connected through your company’s VPN app. Needs Android 7.0 or newer.
- In the Network card, tick Route all traffic through a VPN app next to Always-on VPN.
- In VPN app package name, enter the VPN app’s package name, for example
com.company.vpn. You’ll find it in the app’s Google Play address, afterid=. - Leave Lockdown mode ticked under Block traffic when the VPN is down if devices must never use the internet without the VPN. Untick it to let traffic through while the VPN reconnects.
- Save and publish.
NounDesk installs the VPN app automatically on devices with this policy. Setting up the VPN app itself (your account or server) is done the way your VPN provider describes.
With lockdown on, a device has no internet at all while the VPN app is missing, signed out or can’t connect. The publish preview warns you about this before you publish.
Private DNS
Private DNS decides which service the device uses to look up website addresses. Needs Android 10 or newer and company-owned devices.
| Option | What it means |
|---|---|
| Device default | NounDesk doesn’t change the setting. |
| Automatic | Android’s own automatic Private DNS mode. |
| Employee decides | Employees choose in the device’s settings. |
| Specific host | Every lookup goes to the service you enter in Private DNS host, for example dns.google. |
Block whole categories of websites
Website filtering blocks the sites you list, and only in Google Chrome. To block whole categories, such as adult or gambling sites, across every app:
- Sign up with a filtering DNS service of your choice and pick the categories to block in their dashboard.
- Copy the Private DNS hostname they give you for Android.
- In the policy, set Private DNS to Specific host and paste the hostname into Private DNS host.
- Save and publish.
Use the hostname your provider gives for Android Private DNS. It’s a name such as
example.dns-provider.com, not a number like1.2.3.4.